What's New Here?

How To Add Social Media Icons To Blogger Header

This tutorial will help you to add social media icons in the top right corner of the page which could increases the likehood that readers can follow through the various social network. There are several ways to do this like adding a new widget section to the blog header but now we'll do it using an unordered list that used of facebook, Twitter, Google+ and blog feed and as a bonus the icon will rotate when you hover over them.


Adding Social Media Icons To Blogger Header

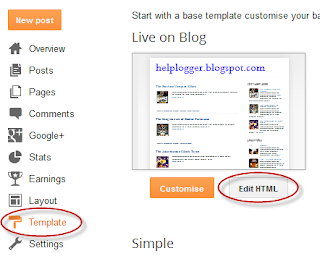
Step 1 From Your Blogger Dashboard go to Template and click on the Edit HTML Buuton .

Adding Social Media Icons To Blogger Header

Step 2. To expand the style, Click on the small arrow on the left of <b:skin>  -  <b:skin>  Then Click anywhere inside the code area to search ( Using CTRL + F ) For the ]]></b:skin> tag and add this code just above it .


 /* Social icons for Blogger

----------------------------------------------- */


#social-icons {

margin-bottom:-30px;

height:50px;

width:100%;

display:block;

clear:both;

z-index: 2;

position: relative;

}

.social-media-icons {

display:table

}

.social-media-icons ul {

text-align:right;

padding:5px 5px 0 0

list-style-image:none;

list-style-position:outside;

list-style-type:none;

}

.social-media-icons ul {

margin-bottom:0;

padding:0;

float:right;

}

.social-media-icons li.media_icon {

margin-left:6px;

padding-left:0 !important;

background:none !important;

display:inline;

float:left;

}

.social-media-icons li:hover {

-moz-transform: rotate(360deg);

-webkit-transform: rotate(360deg);

-o-transform: rotate(360deg);

transform: rotate(-360deg);

-moz-transition: all 0.5s ease-in-out;

-webkit-transition: all 0.5s ease-in-out;

-o-transition: all 0.5s ease-in-out;

-ms-transition: all 0.5s ease-in-out;

transition: all 0.5s ease-in-out;

}
<script src='http://ajax.googleapis.com/ajax/libs/jquery/1.4.2/jquery.min.js' type='text/javascript'></script>


 ScreenShots 1
ScreenShots 1


ScreenShots 2
ScreenShots 2


Step 3 . Now Search For This Line .


<b:section class='header' id='header' maxwidgets='1' showaddelement='no'>
<script src='http://ajax.googleapis.com/ajax/libs/jquery/1.4.2/jquery.min.js' type='text/javascript'></script>

Step 4 . And justt above it, add this Code !!

<div class='social-media-icons' id='social-icons'>

<ul>


<li class='media_icon'><a href='http://facebook.com/username'><img border='0' src='https://blogger.googleusercontent.com/img/b/R29vZ2xl/AVvXsEjXb1bke-qG4GePi_MR4rR3ezQdiF6VwEkMddEB-R2Fiz4YCE-7qq6TESoWPqHs4Q9q01HPDowjewVn46AaeHOt1ro8vL5HdwuuR2YFd7lEl4q7Pa5kBQQCYuarUl5bpf54DneVYxFoA2g/s1600/Facebook.png'/></a></li>


<li class='media_icon'><a href='http://twitter.com/#!/username'><img border='0' src='https://blogger.googleusercontent.com/img/b/R29vZ2xl/AVvXsEiAtSut5BUC68FIYPrQKhUhVeB1oZOTTeOj_YN-7mynGeICLuL_W6-tuBgeEjiwo23yp0amfPN9OcsQMe3fq5N_-G5epbXq3auN_jrV_q4sbPHj62DPWyaisk-hC9RUCEOuciYmf2IUdsw/s1600/Twitter.png'/></a></li>


<li class='media_icon'><a href='https://plus.google.com/XXXXXXXXXXXXXXXXXX/about'><img border='0' src='https://blogger.googleusercontent.com/img/b/R29vZ2xl/AVvXsEjrEm7p00n-0a8JoGdRoRK1BMODuXl3qnou78HHlD7xFTrSSy-ANzaRlz4Mouh3XyJYc5qMgvQ0Y_3Qpjzwqm-C5McQVYhptUKDu3eoRBd3tqtAmUaMifTW-BCg6v_2IKYY3dXqP3VdR7Q/s1600/googleplus.png'/></a></li>


<li class='media_icon'><a href='http://name-of-your-blog.com/feeds/posts/default'><img border='0' src='https://blogger.googleusercontent.com/img/b/R29vZ2xl/AVvXsEioBcZ_D9w4vad2yy0OyhtQyBveOrDXVeVsGQKWy6tiUOp5p3G6IuqFP-jtuddgeG2nArh6dIAzXw-vAtUKjNjFwhWHC1g1AcAJxM0g6pKegPNlBdABzMjpNUmTMVpDcXYXj6321wIGm40/s1600/RSS.png'/></a></li>


</ul></div>

Customization !!

* Change what 's in red with your username and id: the first is your facebook username the second is that of twitter in the third you shouls change the X by the ID Of YourGoogle+Profile and in the fourth you wil put the name of your blog .
* To change the icons , just replace the url with one of your images .
* You can add more icons if you want you just have to add before </ul></div> a line like this for each extra icon you want !!!

<li class='media_icon'><a href='Link URL'><img border='0' src='Image URL'/></a></li>

Step 5 . Fimally Save The Template To Apply The Changes .

How To Add Social Media Icons To Blogger Header

Posted by Unknown 2 comments

How To Add Social Media Icons To Blogger Header

This tutorial will help you to add social media icons in the top right corner of the page which could increases the likehood that readers can follow through the various social network. There are several ways to do this like adding a new widget section to the blog header but now we'll do it using an unordered list that used of facebook, Twitter, Google+ and blog feed and as a bonus the icon will rotate when you hover over them.


Adding Social Media Icons To Blogger Header

Step 1 From Your Blogger Dashboard go to Template and click on the Edit HTML Buuton .

Adding Social Media Icons To Blogger Header

Step 2. To expand the style, Click on the small arrow on the left of <b:skin>  -  <b:skin>  Then Click anywhere inside the code area to search ( Using CTRL + F ) For the ]]></b:skin> tag and add this code just above it .


 /* Social icons for Blogger

----------------------------------------------- */


#social-icons {

margin-bottom:-30px;

height:50px;

width:100%;

display:block;

clear:both;

z-index: 2;

position: relative;

}

.social-media-icons {

display:table

}

.social-media-icons ul {

text-align:right;

padding:5px 5px 0 0

list-style-image:none;

list-style-position:outside;

list-style-type:none;

}

.social-media-icons ul {

margin-bottom:0;

padding:0;

float:right;

}

.social-media-icons li.media_icon {

margin-left:6px;

padding-left:0 !important;

background:none !important;

display:inline;

float:left;

}

.social-media-icons li:hover {

-moz-transform: rotate(360deg);

-webkit-transform: rotate(360deg);

-o-transform: rotate(360deg);

transform: rotate(-360deg);

-moz-transition: all 0.5s ease-in-out;

-webkit-transition: all 0.5s ease-in-out;

-o-transition: all 0.5s ease-in-out;

-ms-transition: all 0.5s ease-in-out;

transition: all 0.5s ease-in-out;

}
<script src='http://ajax.googleapis.com/ajax/libs/jquery/1.4.2/jquery.min.js' type='text/javascript'></script>


 ScreenShots 1
ScreenShots 1


ScreenShots 2
ScreenShots 2


Step 3 . Now Search For This Line .


<b:section class='header' id='header' maxwidgets='1' showaddelement='no'>
<script src='http://ajax.googleapis.com/ajax/libs/jquery/1.4.2/jquery.min.js' type='text/javascript'></script>

Step 4 . And justt above it, add this Code !!

<div class='social-media-icons' id='social-icons'>

<ul>


<li class='media_icon'><a href='http://facebook.com/username'><img border='0' src='https://blogger.googleusercontent.com/img/b/R29vZ2xl/AVvXsEjXb1bke-qG4GePi_MR4rR3ezQdiF6VwEkMddEB-R2Fiz4YCE-7qq6TESoWPqHs4Q9q01HPDowjewVn46AaeHOt1ro8vL5HdwuuR2YFd7lEl4q7Pa5kBQQCYuarUl5bpf54DneVYxFoA2g/s1600/Facebook.png'/></a></li>


<li class='media_icon'><a href='http://twitter.com/#!/username'><img border='0' src='https://blogger.googleusercontent.com/img/b/R29vZ2xl/AVvXsEiAtSut5BUC68FIYPrQKhUhVeB1oZOTTeOj_YN-7mynGeICLuL_W6-tuBgeEjiwo23yp0amfPN9OcsQMe3fq5N_-G5epbXq3auN_jrV_q4sbPHj62DPWyaisk-hC9RUCEOuciYmf2IUdsw/s1600/Twitter.png'/></a></li>


<li class='media_icon'><a href='https://plus.google.com/XXXXXXXXXXXXXXXXXX/about'><img border='0' src='https://blogger.googleusercontent.com/img/b/R29vZ2xl/AVvXsEjrEm7p00n-0a8JoGdRoRK1BMODuXl3qnou78HHlD7xFTrSSy-ANzaRlz4Mouh3XyJYc5qMgvQ0Y_3Qpjzwqm-C5McQVYhptUKDu3eoRBd3tqtAmUaMifTW-BCg6v_2IKYY3dXqP3VdR7Q/s1600/googleplus.png'/></a></li>


<li class='media_icon'><a href='http://name-of-your-blog.com/feeds/posts/default'><img border='0' src='https://blogger.googleusercontent.com/img/b/R29vZ2xl/AVvXsEioBcZ_D9w4vad2yy0OyhtQyBveOrDXVeVsGQKWy6tiUOp5p3G6IuqFP-jtuddgeG2nArh6dIAzXw-vAtUKjNjFwhWHC1g1AcAJxM0g6pKegPNlBdABzMjpNUmTMVpDcXYXj6321wIGm40/s1600/RSS.png'/></a></li>


</ul></div>

Customization !!

* Change what 's in red with your username and id: the first is your facebook username the second is that of twitter in the third you shouls change the X by the ID Of YourGoogle+Profile and in the fourth you wil put the name of your blog .
* To change the icons , just replace the url with one of your images .
* You can add more icons if you want you just have to add before </ul></div> a line like this for each extra icon you want !!!

<li class='media_icon'><a href='Link URL'><img border='0' src='Image URL'/></a></li>

Step 5 . Fimally Save The Template To Apply The Changes .
2 comments:

How To Add Scrolling Posts Widget For Blogger


Scrolling Recents Posts gadget is a best widget to show off recent posts your blog with a jQuery Scroll effect which grabs attension of visitors very quickly . Previousily I Shared a Scrolling/ Ticker recent posts widget but some of you faced  problams while installing it that's why here i am sharing a new scrolling recent posts widget which works a with a  jQuery spy effect this is the best features of this widget. Each snipes of this widget contains title of post thumbnail of post date when post was published and number of comments on that post also all of the above option are fuly customized so that you can easily customized this widget as you wish.Above are the some features of this widget now let's see how to add it into your blogger Blog .

Live Widget Demo
-->


How To Add Scrolling Recent Posts Widget To Blogger?

Step 1 !!

This Widget works with jQuery spy effect so that we have to jQuery library to our blog first ( Note - Ignore This step if you have already added jQuery library to your blog. )

1. Go To Blogger Dashboard > Template .
2. Click On Edit HTML .
3. Hit Proceed Button .
4. Find Below Code In Your Template .

</head>

add beloe code just above it .
<script src='http://ajax.googleapis.com/ajax/libs/jq
<script src='http://ajax.googleapis.com/ajax/libs/jquery/1.4.2/jquery.min.js' type='text/javascript'></script>

Now You Have implemented jQuery library into your blog. Now Lets see how to add scrolling recent posts widget to blogger .

Step 2 !!

1. Go To Blogger Dashboard > Layout .
* Click On Add A Gadget .
* Select HTML/JabaScript .

Past Below Code Inside It .

<style type="text/css" media="screen">
<!--

/* ========== Scrolling Recent Posts Widget By helperblogger.com ======== */

#helperblogger-widget {
    overflow: hidden;
    margin-top: 5px;
    padding: 0px 0px;
    height: 385px;
}

#helperblogger-widget ul {
    width: 295px;
    overflow: hidden;
    list-style-type: none;
    padding: 0px 0px;
    margin: 0px 0px;
}

#helperblogger-widget li {
    width: 282px;
    padding: 5px 5px;
    margin: 0px 0px 5px 0px;
    list-style-type: none;
    float: none;
    height: 80px;
    overflow: hidden;
    background: #fff url(https://blogger.googleusercontent.com/img/b/R29vZ2xl/AVvXsEiVABr-crOtAW_b76aXUgfpDe9JiIbfwFxSnaM5qFU7cGEpPv_UQMsotwKMok4j3_5PUIq-YHFVgezpHIYW5bMlI9P_yZFmJjQVLxDhd53PI4rW-S7Sd_NYlNxP3AVgpfm532g_vVt7VrU/s1600/helperblogger.com-post.jpg) repeat-x;
    border: 1px solid #ddd;
}

#helperblogger-widget li a {
    text-decoration: none;
    color: #4B545B;
    font-size: 15px;
    height: 18px;
    overflow: hidden;
    margin: 0px 0px;
    padding: 0px 0px 2px 0px;
}

#helperblogger-widget img {
    float: left;
    margin-top: 10px;
    margin-right: 15px;
    background: #EFEFEF;
    border: 0;
}

#helperblogger-widget img {
    -webkit-transition: all 0.5s ease;
    -moz-transition: all 0.5s ease;
    transition: all 0.5s ease;
    padding: 4px;
    background: #eee;
    background: -webkit-gradient(linear, left top, left bottom, from(#eee), color-stop(0.5, #ddd), color-stop(0.5, #c0c0c0), to(#aaa));
    background: -moz-linear-gradient(top, #eee, #ddd 50%, #c0c0c0 50%, #aaa);
    -webkit-border-radius: 4px;
    -moz-border-radius: 4px;
    border-radius: 4px;
    -webkit-box-shadow: 0 0 3px rgba(0,0,0,.7);
    -moz-box-shadow: 0 0 3px rgba(0,0,0,.7);
    box-shadow: 0 0 3px rgba(0,0,0,.7);
}

#helperblogger-widget img:hover {
    -moz-transform: scale(1.2) rotate(-350deg);
    -webkit-transform: scale(1.2) rotate(-350deg);
    -o-transform: scale(1.2) rotate(-350deg);
    -ms-transform: scale(1.2) rotate(-350deg);
    transform: scale(1.2) rotate(-350deg);
    -webkit-box-shadow: 0 0 20px rgba(255,0,0,.4), inset 0 0 20px rgba(255,255,255,1);
    -moz-box-shadow: 0 0 20px rgba(255,0,0,.4), inset 0 0 20px rgba(255,255,255,1);
    box-shadow: 0 0 20px rgba(255,0,0,.4), inset 0 0 20px rgba(255,255,255,1);
}

.spydate {
    overflow: hidden;
    font-size: 10px;
    color: #0284C2;
    padding: 2px 0px;
    margin: 1px 0px 0px 0px;
    height: 15px;
    font-family: Tahoma,Arial,verdana, sans-serif;
}

.spycomment {
    overflow: hidden;
    font-family: Tahoma,Arial,verdana, sans-serif;
    font-size: 10px;
    color: #262B2F;
    padding: 0px 0px;
    margin: 0px 0px;
}

/* ========== Scrolling Recent Posts Widget By helperblogger.com ======== */

-->
</style>

<script language='JavaScript'> 
imgr = new Array();
imgr[0] = "https://blogger.googleusercontent.com/img/b/R29vZ2xl/AVvXsEixVU1VrZ1UYKoL0_tn2tTMJJFTYHJ4pgvxn56fD9p3JFM5ccSCYHpo3KGH_taxkVDyr-E4cWkMdXZF-XKj0QyUbqu35uqFe85-ELFf6kW7kTabfOBDWQUn8cDfcR0LBW63lMZ9mHNdM4U/s1600/no-thumbnail.png";
imgr[1] = "https://blogger.googleusercontent.com/img/b/R29vZ2xl/AVvXsEixVU1VrZ1UYKoL0_tn2tTMJJFTYHJ4pgvxn56fD9p3JFM5ccSCYHpo3KGH_taxkVDyr-E4cWkMdXZF-XKj0QyUbqu35uqFe85-ELFf6kW7kTabfOBDWQUn8cDfcR0LBW63lMZ9mHNdM4U/s1600/no-thumbnail.png";
imgr[2] = "https://blogger.googleusercontent.com/img/b/R29vZ2xl/AVvXsEixVU1VrZ1UYKoL0_tn2tTMJJFTYHJ4pgvxn56fD9p3JFM5ccSCYHpo3KGH_taxkVDyr-E4cWkMdXZF-XKj0QyUbqu35uqFe85-ELFf6kW7kTabfOBDWQUn8cDfcR0LBW63lMZ9mHNdM4U/s1600/no-thumbnail.png";
imgr[3] = "https://blogger.googleusercontent.com/img/b/R29vZ2xl/AVvXsEixVU1VrZ1UYKoL0_tn2tTMJJFTYHJ4pgvxn56fD9p3JFM5ccSCYHpo3KGH_taxkVDyr-E4cWkMdXZF-XKj0QyUbqu35uqFe85-ELFf6kW7kTabfOBDWQUn8cDfcR0LBW63lMZ9mHNdM4U/s1600/no-thumbnail.png";
imgr[4] = "https://blogger.googleusercontent.com/img/b/R29vZ2xl/AVvXsEixVU1VrZ1UYKoL0_tn2tTMJJFTYHJ4pgvxn56fD9p3JFM5ccSCYHpo3KGH_taxkVDyr-E4cWkMdXZF-XKj0QyUbqu35uqFe85-ELFf6kW7kTabfOBDWQUn8cDfcR0LBW63lMZ9mHNdM4U/s1600/no-thumbnail.png";
showRandomImg = true;
boxwidth = 255;
cellspacing = 6;
borderColor = "#232c35";
bgTD = "#000000";
thumbwidth = 50;
thumbheight = 50;
fntsize = 15;
acolor = "#666";
aBold = true;
icon = " ";
text = "comments";
showPostDate = true;
summaryPost = 40;
summaryFontsize = 10;
summaryColor = "#666";
icon2 = " ";
numposts = 10;
home_page = "http://prohelpers.blogspot.com/";
limitspy=4;
intervalspy=4000;
</script>

<div id="helperblogger-widget">
<script src='http://code.helperblogger.com/recent-posts-spy.js' type='text/javascript'></script>
</div>

Now Replace http://Www.Prohelpers.blogspot.com/ With Your Blog URL .

Widget Customizations .

As I Mentioned above this widget is fully customizable you can it at your own just by reading the properties of the valvues such as numposts means Number Of Posts. In Above code i am highlighting some valvues which you can simply edit them. Also I Highly Recomended you that done all the changes in our HTML Editor With using the html editor you can simply customize this widget as you wish with  watching prewie of your changes .
 Below I Am describing some imprtant values , 

* Numposts = 10; Total Of posts which you wants scroll by this widget .
* limitspy=4 ; number of the posts to apear on the widget .
* intervalspy=4000; Scrolling speed of the widget, if you decreased thw value speed of widget will increases .

Finaly Save Your All Changes and visit you blog to see the working widget .

How To Add Scrolling Posts Widget For Blogger

Posted by Unknown 1 comment

How To Add Scrolling Posts Widget For Blogger


Scrolling Recents Posts gadget is a best widget to show off recent posts your blog with a jQuery Scroll effect which grabs attension of visitors very quickly . Previousily I Shared a Scrolling/ Ticker recent posts widget but some of you faced  problams while installing it that's why here i am sharing a new scrolling recent posts widget which works a with a  jQuery spy effect this is the best features of this widget. Each snipes of this widget contains title of post thumbnail of post date when post was published and number of comments on that post also all of the above option are fuly customized so that you can easily customized this widget as you wish.Above are the some features of this widget now let's see how to add it into your blogger Blog .

Live Widget Demo
-->


How To Add Scrolling Recent Posts Widget To Blogger?

Step 1 !!

This Widget works with jQuery spy effect so that we have to jQuery library to our blog first ( Note - Ignore This step if you have already added jQuery library to your blog. )

1. Go To Blogger Dashboard > Template .
2. Click On Edit HTML .
3. Hit Proceed Button .
4. Find Below Code In Your Template .

</head>

add beloe code just above it .
<script src='http://ajax.googleapis.com/ajax/libs/jq
<script src='http://ajax.googleapis.com/ajax/libs/jquery/1.4.2/jquery.min.js' type='text/javascript'></script>

Now You Have implemented jQuery library into your blog. Now Lets see how to add scrolling recent posts widget to blogger .

Step 2 !!

1. Go To Blogger Dashboard > Layout .
* Click On Add A Gadget .
* Select HTML/JabaScript .

Past Below Code Inside It .

<style type="text/css" media="screen">
<!--

/* ========== Scrolling Recent Posts Widget By helperblogger.com ======== */

#helperblogger-widget {
    overflow: hidden;
    margin-top: 5px;
    padding: 0px 0px;
    height: 385px;
}

#helperblogger-widget ul {
    width: 295px;
    overflow: hidden;
    list-style-type: none;
    padding: 0px 0px;
    margin: 0px 0px;
}

#helperblogger-widget li {
    width: 282px;
    padding: 5px 5px;
    margin: 0px 0px 5px 0px;
    list-style-type: none;
    float: none;
    height: 80px;
    overflow: hidden;
    background: #fff url(https://blogger.googleusercontent.com/img/b/R29vZ2xl/AVvXsEiVABr-crOtAW_b76aXUgfpDe9JiIbfwFxSnaM5qFU7cGEpPv_UQMsotwKMok4j3_5PUIq-YHFVgezpHIYW5bMlI9P_yZFmJjQVLxDhd53PI4rW-S7Sd_NYlNxP3AVgpfm532g_vVt7VrU/s1600/helperblogger.com-post.jpg) repeat-x;
    border: 1px solid #ddd;
}

#helperblogger-widget li a {
    text-decoration: none;
    color: #4B545B;
    font-size: 15px;
    height: 18px;
    overflow: hidden;
    margin: 0px 0px;
    padding: 0px 0px 2px 0px;
}

#helperblogger-widget img {
    float: left;
    margin-top: 10px;
    margin-right: 15px;
    background: #EFEFEF;
    border: 0;
}

#helperblogger-widget img {
    -webkit-transition: all 0.5s ease;
    -moz-transition: all 0.5s ease;
    transition: all 0.5s ease;
    padding: 4px;
    background: #eee;
    background: -webkit-gradient(linear, left top, left bottom, from(#eee), color-stop(0.5, #ddd), color-stop(0.5, #c0c0c0), to(#aaa));
    background: -moz-linear-gradient(top, #eee, #ddd 50%, #c0c0c0 50%, #aaa);
    -webkit-border-radius: 4px;
    -moz-border-radius: 4px;
    border-radius: 4px;
    -webkit-box-shadow: 0 0 3px rgba(0,0,0,.7);
    -moz-box-shadow: 0 0 3px rgba(0,0,0,.7);
    box-shadow: 0 0 3px rgba(0,0,0,.7);
}

#helperblogger-widget img:hover {
    -moz-transform: scale(1.2) rotate(-350deg);
    -webkit-transform: scale(1.2) rotate(-350deg);
    -o-transform: scale(1.2) rotate(-350deg);
    -ms-transform: scale(1.2) rotate(-350deg);
    transform: scale(1.2) rotate(-350deg);
    -webkit-box-shadow: 0 0 20px rgba(255,0,0,.4), inset 0 0 20px rgba(255,255,255,1);
    -moz-box-shadow: 0 0 20px rgba(255,0,0,.4), inset 0 0 20px rgba(255,255,255,1);
    box-shadow: 0 0 20px rgba(255,0,0,.4), inset 0 0 20px rgba(255,255,255,1);
}

.spydate {
    overflow: hidden;
    font-size: 10px;
    color: #0284C2;
    padding: 2px 0px;
    margin: 1px 0px 0px 0px;
    height: 15px;
    font-family: Tahoma,Arial,verdana, sans-serif;
}

.spycomment {
    overflow: hidden;
    font-family: Tahoma,Arial,verdana, sans-serif;
    font-size: 10px;
    color: #262B2F;
    padding: 0px 0px;
    margin: 0px 0px;
}

/* ========== Scrolling Recent Posts Widget By helperblogger.com ======== */

-->
</style>

<script language='JavaScript'> 
imgr = new Array();
imgr[0] = "https://blogger.googleusercontent.com/img/b/R29vZ2xl/AVvXsEixVU1VrZ1UYKoL0_tn2tTMJJFTYHJ4pgvxn56fD9p3JFM5ccSCYHpo3KGH_taxkVDyr-E4cWkMdXZF-XKj0QyUbqu35uqFe85-ELFf6kW7kTabfOBDWQUn8cDfcR0LBW63lMZ9mHNdM4U/s1600/no-thumbnail.png";
imgr[1] = "https://blogger.googleusercontent.com/img/b/R29vZ2xl/AVvXsEixVU1VrZ1UYKoL0_tn2tTMJJFTYHJ4pgvxn56fD9p3JFM5ccSCYHpo3KGH_taxkVDyr-E4cWkMdXZF-XKj0QyUbqu35uqFe85-ELFf6kW7kTabfOBDWQUn8cDfcR0LBW63lMZ9mHNdM4U/s1600/no-thumbnail.png";
imgr[2] = "https://blogger.googleusercontent.com/img/b/R29vZ2xl/AVvXsEixVU1VrZ1UYKoL0_tn2tTMJJFTYHJ4pgvxn56fD9p3JFM5ccSCYHpo3KGH_taxkVDyr-E4cWkMdXZF-XKj0QyUbqu35uqFe85-ELFf6kW7kTabfOBDWQUn8cDfcR0LBW63lMZ9mHNdM4U/s1600/no-thumbnail.png";
imgr[3] = "https://blogger.googleusercontent.com/img/b/R29vZ2xl/AVvXsEixVU1VrZ1UYKoL0_tn2tTMJJFTYHJ4pgvxn56fD9p3JFM5ccSCYHpo3KGH_taxkVDyr-E4cWkMdXZF-XKj0QyUbqu35uqFe85-ELFf6kW7kTabfOBDWQUn8cDfcR0LBW63lMZ9mHNdM4U/s1600/no-thumbnail.png";
imgr[4] = "https://blogger.googleusercontent.com/img/b/R29vZ2xl/AVvXsEixVU1VrZ1UYKoL0_tn2tTMJJFTYHJ4pgvxn56fD9p3JFM5ccSCYHpo3KGH_taxkVDyr-E4cWkMdXZF-XKj0QyUbqu35uqFe85-ELFf6kW7kTabfOBDWQUn8cDfcR0LBW63lMZ9mHNdM4U/s1600/no-thumbnail.png";
showRandomImg = true;
boxwidth = 255;
cellspacing = 6;
borderColor = "#232c35";
bgTD = "#000000";
thumbwidth = 50;
thumbheight = 50;
fntsize = 15;
acolor = "#666";
aBold = true;
icon = " ";
text = "comments";
showPostDate = true;
summaryPost = 40;
summaryFontsize = 10;
summaryColor = "#666";
icon2 = " ";
numposts = 10;
home_page = "http://prohelpers.blogspot.com/";
limitspy=4;
intervalspy=4000;
</script>

<div id="helperblogger-widget">
<script src='http://code.helperblogger.com/recent-posts-spy.js' type='text/javascript'></script>
</div>

Now Replace http://Www.Prohelpers.blogspot.com/ With Your Blog URL .

Widget Customizations .

As I Mentioned above this widget is fully customizable you can it at your own just by reading the properties of the valvues such as numposts means Number Of Posts. In Above code i am highlighting some valvues which you can simply edit them. Also I Highly Recomended you that done all the changes in our HTML Editor With using the html editor you can simply customize this widget as you wish with  watching prewie of your changes .
 Below I Am describing some imprtant values , 

* Numposts = 10; Total Of posts which you wants scroll by this widget .
* limitspy=4 ; number of the posts to apear on the widget .
* intervalspy=4000; Scrolling speed of the widget, if you decreased thw value speed of widget will increases .

Finaly Save Your All Changes and visit you blog to see the working widget .

1 comments:

Proudly Powered by Blogger.
back to top